Thursday 15 May 2014

Cuteness Injection: Dose #4


"Fairy Kei-kes"

A sugary sweet, pink photography piece this time. Faux cupcakes and lollipops made by yours truly. :3

Tuesday 1 April 2014

OOTD #1: Bows, bows, bows!

Just a quick little 'outfit of the day post' to show-off my adorable new dress, made by the lovely Lisa over at DashAmbler. The theme of this outfit of the day is bows, because who doesn't love dainty little bows?

Cardigan: George
Crown Ring: Chocomint
Dress: DashAmbler
Hair Bows: Hand-Made
Pearl Necklace & Bracelet: Matalan
Rocking Horse Ring: Hand-Made
Shoes: Bodyline
Socks: Bodyline

I can't stand to show you the pretty little bows on the side of my dress, but I assure you they're there (just hiding), and I really recommend buying from Lisa if you're a plus-sized girl in the UK (like myself) and struggle to find hime-gyaru, lolita (or whatever your style) clothing.

Monday 31 March 2014

Cuteness Injection: Dose #3

I have a review of Bodyline's shoes 192 (in Sax, blue) and 178 (in Owh-Pik, off-white and pale pink) on the way, as well as a review of a new brown 'hime' wig from Ebay, but in the mean time I'll tide you all over with my latest piece of artwork;

Attack of the Ice-Cream Monsters!

Gingerbread houses are some of the most adorable things ever. Period.

Tuesday 11 March 2014

Cuteness Injection: Dose #2

Apologies for any pixelation, it happens when I reduce the file size.


"Jelly Pop Princess"

I went a liiiiittle bit overboard with the roses, but who doesn't like roses?

Sunday 9 March 2014

Review Time! Koji: 'Dolly Wink' Lashes in 'Dolly Sweet' & Diamond Lash: 'Sweet Eye' Lower Lashes (Picture Heavy!)


Yesterday I received my Koji: 'Dolly Wink' lashes in 'Dolly Sweet' and my Diamond Lash 'Sweet Eye' lower lashes from Dreamybows.co.uk! So prepare your pupils for a very picture heavy post.

Before start waffling, I just want to clarify that this only my opinion and that you may have an entirely different one. So just take my words with a pinch of salt (or sugar and lemon juice, if that's more to your taste).

Left; Diamond Lash, lower lashes in 'Sweet Eye'.
Contains: 5 pairs of individual, lower lashes.
Cost: £11.50.

Right; Koji's 'Dolly Wink' lashes in 'Dolly Sweet'
Contains: 2 pairs of lashes and a small tube of lash glue.
Cost: £12.50


Before now, I'd never worn lower lashes or individual top lashes, so you can imagine the look of complete horror on my face (comparable to when your mother steals the last, heavenly morsel of cake which you'd been saving for an almost orgasmic, climactic finish to your meal...or is it just mine who does that?) when I discovered that these lashes don't come on a single lash band.

The glue was incredibly tacky so when I detached these from the tray pieces of long, stretchy glue remained attached to the lash (although it was easy enough to remove)


Is there a reason Koji decided to leave a tiny bit of clear lash band at the edge of their lashes?


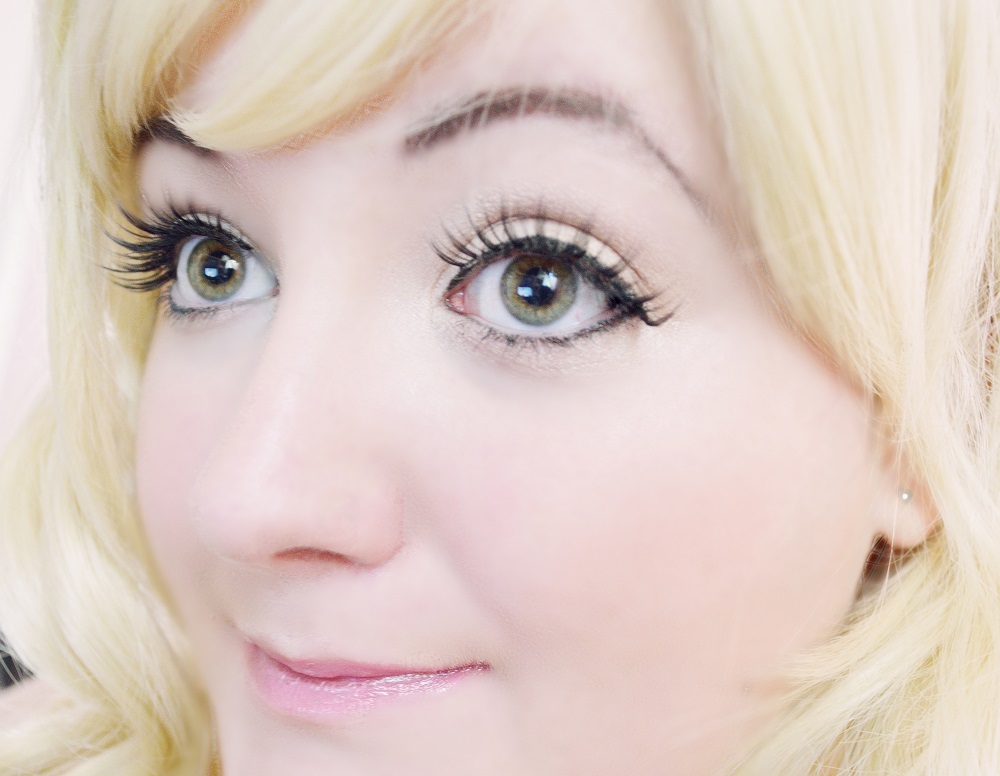
Time for some before and after images! Warning: Creepy eye-close ups approaching.


Eyes open/closed with L'oreal gel eyeliner and Soap & Glory 'Thick & Fast' mascara applied to lashes.
My eyelashes have 0% volume even with mascara on (although I didn't curl them, so maybe that would've solved that issue).


Koji's 'Dolly Wink' lashes only. That's quite a difference, huh?

I didn't cut them (They cost £12.50, I'm going to use every bit of them!) so they have a very...alien and unnatural appearance, but I guess that's the whole point since they're meant to give you a lovely, big, dolly eye.
I really don't recommend wearing these on their own unless you have long lower lashes, plan on wearing false lower lashes, or intentionally want to look like you're transitioning from human to peafowl.

I had to fill parts of the band in with eyeliner because the glue didn't dry completely clear. This isn't too much of an issue but I've never had this problem with my trust Katy Perry lashes (in 'Cool Kitty').


Props to Georgina Doull of Cupcake's Clothes and Dolly Darling for this adorable, glittery deer headband!


Koji's 'Dolly Wink' lashes and Diamond Lash's 'Sweet Eye' lower lashes.

MUCH better! Now, I don't look natural, not in the slightest, but I aimed for a 'little china doll with big eyes that follow you around the room' kind of look anyway and I think I pulled that off pretty nicely.

I didn't wear the smallest lashes on my inner eye because they looked nice enough as they were (and I'd almost poked my eye out enough already).


Are they worth the cost? Yes and no; if you want a 'doll' look and don't plan on wearing these on a regular basis (or if you plan on taking really good care of them) then they're worth the cost.

Would I buy these again? Yes, but only after these ones are so tattered and glue-covered that I couldn't bear to stick them on my face.


Saturday 8 March 2014

DIY: Hime Gyaru Edition (#2) Hime Gyaru Inspired Hair Clip


I loathe taking pictures in the same outfit twice - I have no problems wearing the same outfit multiple times, but photographing it more than once? No thank you. This is why, when I received my blonde wig in the post, I rummaged around my room for a hair accessory which I hadn't photographed to death before (no such luck). The solution? Make my own!


I'm sorry I haven't photographed the process (I had no idea I'd want to blog at the time), but I'll let you in on a secret little miracle worker which fulfils all of your crafty needs; hot glue. The best part of all? My fingers don't look like I tried to break my way out of an acupuncture clinic.

What you will need;
Cardboard
Scissors
Hot glue & Hot glue gun
Alligator clip and/or double pronged hair clip
Felt and/or fabric
Lace
Pleated ribbon trim
A string of pearls
Small organza bow
Crown cabochon

You can probably guess the steps I took to make the hair clip, but I'll include them anyway;
1) Cut a circle out of cardboard
2) Glue two circular piece of felt to the front & back of the cardboard
3) Glue two separate strings of pearls to the back of the circle (one longer, one shorter, and make sure to only glue one pearl on each side of the string the back of the circle, so that it drapes down when attached to the head)
4) Glue lace around the back of the circle and over the pearls
4) Glue the pleated ribbon trim around the front of the circle
5) Glue a string of pearls on the inside edge of the ribbon trim
6) Glue an organza bow to the front of the ribbon trim to hide the seam (attaching a pearl to the bow is optional)
7) Finally, glue a crown cabochon in the centre of your hair-piece, et voila! You're all finished.

Now this hair accessory isn't the best quality (you can visibly see the lace is a bit dodgy), but it only cost me £2 to make (since I only bought the ribbon trim and used whatever else I had floating around my room).
£2 vs a £22 Hime Dreams bow from DreamyBows.co.uk? If I planned to wear it more than a few times I would definitely choose the Hime Dreams bow, but my little hime-gyaru inspired hair clip does the job for now.


DIY: Hime Gyaru Edition (#1) Trinket Box & Mirror (Inspired by Emmeline from TransparentFawn.Blogspot)


Emmeline from TransparentFawn.Blogspot created a beautiful, romantic hime-gyaru mirror which really caught my eye, so I just HAD to make one for myself.


I didn't change Emmeline's design too much. I still used the;
Cherry Blossoms
Two layers of lace along the top of the mirror
Strings of pearls
A ribbon in the centre
Why adapt too much when something already looks gorgeous enough?

I did adapt a few elements of the mirror to give my own little spin on it;
Instead of two layers of white lace along the top of the mirror, I used one layer of pink. To make the lace 'pop' I added smaller, darker cherry blossoms with a much larger pink ribbon (with a pearl in the centre)

Since I used a small, table-top mirror I added a string of pearls and two cherry blossom corners to the base.
I also added a few furniture appliques to the mirror to match my drawers and give it a bit of a rococo twist. As you can imagine, the mirror began to become pretty top-heavy at this point so I left it as it is (even though I did want to add a second layer of pearls).


After making the mirror I still had plenty of supplies remaining, and a lot less space in my (already overrun) room, so I thought why not make a trinket box to store my decoden materials?

I wanted the trinket box to match the mirror, but look a bit more extravagant, so I added two strings of pearls (with pearl borders along the top), a gemstone cabochon and a crown cabochon to really emphasise the 'princess' theme.

I included my Chocomint crown themed accessories in the picture, because they were too adorable not to!